Description
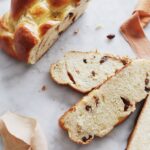
This easy round challah recipe for Rosh Hashanah includes a step-by-step braiding tutorial, making it an ideal challah recipe for beginner bakers. Making round challah is a little time-intensive, so I highly recommend reading all the way through to the end of the recipe and thinking carefully about your timing to make sure you’ve planned out your day accordingly. But the end results are more than worth it: Fluffy, picturesque, just-dense-enough round challah with a subtle (and completely adjustable!) sweetness level.
Ingredients
For the dough:
- 2 1/4 teaspoons active dry yeast (if you’re using packets, depending on the brand, this usually translates to a little more than one; still, you’ll want to measure it out carefully to be sure)
- 1 tablespoon granulated sugar
- 1 cup warm water (if you want to be precise, between 95° and 110° Fahrenheit is ideal)
- 2 1/2 cups all-purpose flour, divided, plus another 1/2 cup for your work surface
- 2 cups bread flour
- 2 large eggs, room temperature (you can warm them up quickly by letting them sit in a glass of warm water)
- 1/2 cup neutral oil (options include avocado oil, canola/vegetable oil, sunflower seed oil, and grapeseed oil; olive oil works fine as a substitute)
- 1/4 cup honey
- 1 tablespoon kosher salt
For the cinnamon-raisin filling:
- 1 1/4 teaspoons ground cinnamon
- 5 tablespoons light brown sugar
- 1/2 cup raisins
For the egg wash:
- 1 large egg
- 1 tablespoon water
Instructions
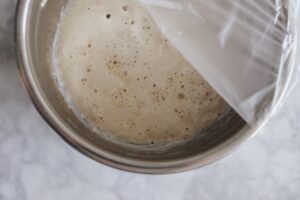
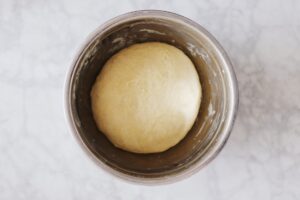
- Dissolve the yeast with sugar, water, and flour: In a large bowl, thoroughly mix together the yeast, sugar, warm water, and 1 cup of the all-purpose flour until all ingredients are incorporated and no lumps remain. Scrape down the sides if needed with a rubber spatula, then cover the bowl with a dish towel or piece of plastic wrap and let sit at room temperature for 1 hour. (Note that you should see some bubbling/foaming and observe a subtle beer-like smell within just a minute or two—that’s how you’ll know your yeast is, in fact, active andnot expired.) Here’s how it might look after an hour:
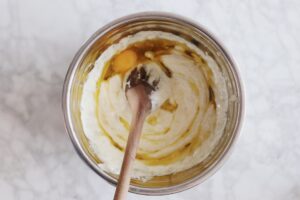
- Add the rest of the wet ingredients: When the hour is up, crack the eggs directly on top of the now-foamy mixture, then pour in the honey and oil. Rigorously stir the mixture together until thoroughly incorporated and perfectly uniformin color and texture.
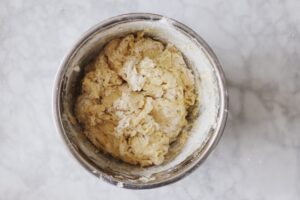
- Add dry ingredients and begin the kneading process: Add the salt, the remaining 1 1/2 cups all-purpose flour (continue to retain the 1/2 cup for your eventual work surface), and all of the bread flour. Use a wooden spoon to mix the ingredients together until you’re looking at a (very!) disheveled-looking dough ball. It’ll be pretty messy at this point; not to worry; you’re on the right track. At this point, throw on a pair of latex gloves (optional, but I prefer to use them for a few minutes while things are extra messy), then get your hands into the bowl and keep up the initial kneading. After another minute, you’ll be looking at an ever-so-slightly more cohesive dough mass.
- Finish the kneading process outside of the bowl: Sprinkle your work surface with a few tablespoons of the retained all-purpose flour. Remove the sticky mass of dough from the mixer bowl and place it on the well-floured surface; continue knead by hand for another 3 to 4 minutes until the dough ball is round, smooth, and supple. You might not need all of the retained flour (I typically use a little more than 1/4 cup), but continue adding until you’re satisfied with the dough’s appearance and texture: It should be smooth, supple, and tacky to the touch, but not sticky (in other words, don’t over-flour the dough if you can help it; some tackiness is expected and desired). Depending on the climate, season, and temperature within your home, you might find you need more or less of this “extra” flour each week.

- First rise: Finish shaping the dough into a true ball, then place it in an oiled bowl (lightly greased by hand with about 1 tablespoon of any oil—this just ensures that the dough doesn’t stick to the sides of the bowl as it rises). Cover the bowl and let the dough rise at room temperature for 1 hour and 30 minutes or until it’s doubled in size.
- Make the filling: While the dough is rising, make the filling by mixing together the cinnamon and brown sugar; set aside.
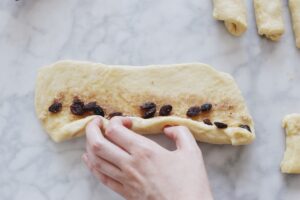
- Divide the dough, fill, and shape into rope-like strands: Once time’s up, remove the dough from the bowl. Use a bench scraper or sharp knife to divide it into four equal parts (**or eight, if you’re planning on making two loaves**). Use a rolling pin (or the palms of your hands) to shape each resulting triangle into a flat rectangle; it’ll be a little oblong, but that’s okay. Then, sprinkle about 1/8 of the sugar mixture onto the rectangle followed by a smattering of raisins, leaving at least a 1″ border on one of the long edges. Use your fingers to carefully roll up each dough portion into a short, snake-like strand. Continue rolling the strands to gently lengthen. You’re aiming for a final length of ~10-12 inches (see next step if you aren’t able to get all the way there). Gently pinch each strand at the seam to secure (to ensure that filling doesn’t leak out in baking process). Repeat process until all remaining dough portions are filled and rolled out.
- Let the strands “rest” before lengthening them one more time: Optional, but I like to cover the strands with a kitchen towel and let them rest for a few minutes before returning for one last rolling spree; I find I can get an additional inch or two out of them when I work this way.
- Braid: There are so many ways to achieve a 4-strand braid, but here’s how I like to go about it:
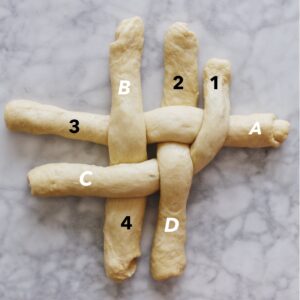
Start by prepping your strands. Make a “pound/hashtag” shape by placing two of the strands parallel to one another, then place the other two strands on top of, and perpendicular to, the first two.

Next, tweak that shape a little to create a simple “basket weave” shape. Simply stitch the snakes together in an alternating fashion, going “under” and “over,” like so: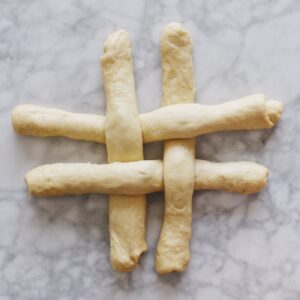
Now you’re really ready to begin braiding. First of all, for clarity’s sake, let’s give names to all of the strands.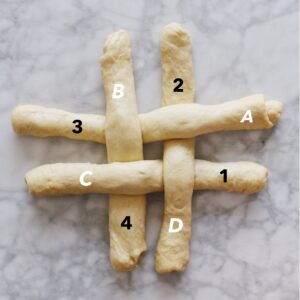
As you can see, in the image above, I’ve numbered all of the strands that are “under” other strands (1, 2, 3, 4), and I’ve lettered all of the strands that are “over” other strands (A, B, C, D). The entire braiding process is essentially a matter of taking “under” strands and turning them into “over” strands.You’re going to start by taking Strand 1, which starts out as an “under” strand, and bringing it up and over Strand A:
Next, let’s take another “under” strand and bring it “over” its neighbor: Strand 2 over Strand B.
Onto the next “under” strand (in counter-clockwise order)—Strand 3! Let’s move Strand 3 up and over Strand C. See the pattern?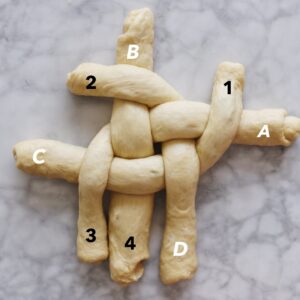
And one more “under-over” transformation: We’ll move Strand 4 over Strand D to finish things up.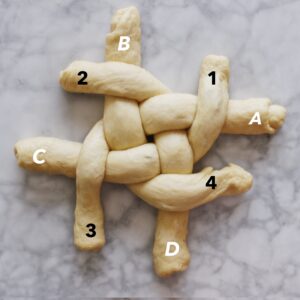
At this point, all of your numbered strands have safely made their way over your lettered strands. Now, you’re going to repeat the whole over-under process, but you’re going to go in the opposite direction this time—clockwise. Start by bringing Strand A over Strand 4.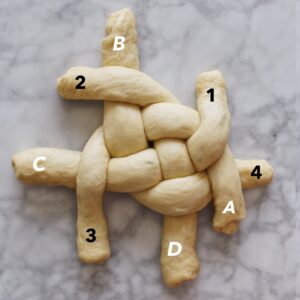
Next, bring Strand D over Strand 3.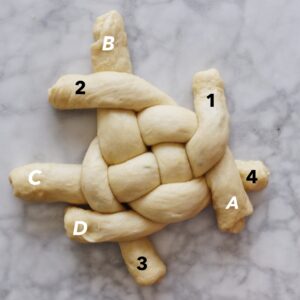
Then, bring Strand C over Strand 2.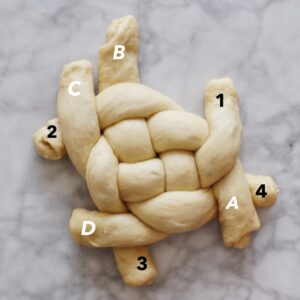
And finally, bring Strand B over Strand 1.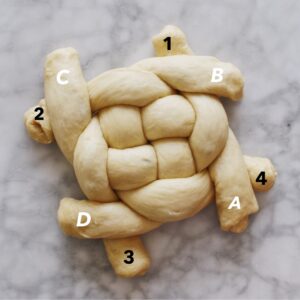
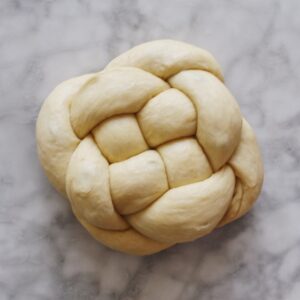
And…you’re done! You’ll end up with a few stubby pieces hanging out; simply tuck each of these beneath the loaf.(Note: You might have enough dough leftover to repeat the braiding process one more time, moving in a counter-clockwise direction once again, before tucking the loose pieces beneath the loaf.)
The eventual shape should look something like this:
- Second rise: Transfer the braided loaf to a parchment-lined baking sheet and cover loosely with a dish towel; let rise at room temperature for about 30 minutes. (If you’re making two loaves, now’s the time to repeat the braiding process.) Preheat the oven to 350° Fahrenheit. Prep your egg wash by whisking together the egg and water in a small bowl.
- Egg wash and bake: When the second rise is up and your oven is preheated, use a pastry brush to coat the exterior of the loaf with egg wash, making sure to get in all the nooks and crannies. Bake for 30 to 35 minutes or until dark brown. You might have to add a few minutes depending on your oven, so keep a close eye on the bread and determine for yourself when you’ve reached the right hue. If the bread is browning much too quickly and turning an extra-dark hue (unlikely but it can happen), remove it from the oven, tent the overly browned areas or the entire thing with aluminum foil, and quickly return it to the oven to finish the internal baking process.
- Let rest and serve: It’s tempting to dive right in, but it’s best to allow the loaf/loaves to rest for at least 30 minutes before serving as they’re technically still cooking on the inside (they’ll be too hot to eat right away anyway). Then, slice, serve warm, and enjoy!
Notes
- Making the dough ahead of time: It’s possible to make your challah dough ahead of time—find information on doing that over here. I strongly recommend waiting to officially bake the challah until the actual day you plan to serve it, though. Day-old challah is still delicious (particularly if you wrap it tightly to seal from air), but it’s ideal on the day it’s baked; save the leftovers for things like French toast, croutons, and the like.
- Substituting bread flour for all-purpose flour (and vice versa): If you don’t have one or the other of these ingredients, you can, in fact, swap them out for each other as needed, using only all-purpose or only bread flour to make your dough. That said, don’t expect an “ideal” loaf—and consider just running out to the store if you can (you’ve got plenty of time to do so with all that rising time!). While both substitutions are possible, the preferable swap is the use of all-purpose in place of bread flour.
- Substituting active dry yeast for instant yeast: For the purposes of this exact method/recipe, I don’t recommend it. If that’s all you have on hand, do a quick search for an instant yeast challah recipe instead!
- Letting the dough rise too long: Generally speaking, if you let the dough rise for a little too long here or there (i.e. not significant amounts—5, 10, 20 minutes), it shouldn’t be a huge issue—so don’t sweat it. What’s more, the times shared in this and other challah recipes are actually just estimated averages; depending on the altitude and temperature of your home, more or less time will be required anyway for an “ideal” bake.
- Serving idea: If serving several hours after baking, pop the loaf/loaves back into the oven for a quick reheat; just make sure you keep the temperature low, only throw them in for up to ten minutes, and (please) don’t forget about them!
Keywords: round challah, rosh hashanah challah, raisin challah, easy rosh hashanah challah recipe